Getting Started With Microsoft Access – Creating Tables
The first step in building a Microsoft Access database is creating the tables. Creating tables in Access is quite different from tasks in other Microsoft Office programs, so let’s walk through the process step by step.
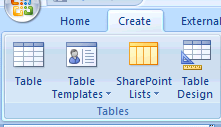
Step 1: Create a new table in Access – When you have completed your database design, you’re ready to begin creating tables in Access. Click the “Create” tab at the top of the screen and then you should see a number of choices in the “Tables” section of the ribbon:

If you click “Table”, Access will open a new table and you can immediately begin entering your data. Sounds great, right? Well, it is easy, but this option will create a table with generic column names (Field1, Field2, etc) and Access will make a best guess as to whether you want the field to have text, numeric values, or some other data type. Choose “Table Design” from the ribbon for a more usable and professional database.
Step 2: Enter fields and specify field types – Clicking the “Table Design” option will open a new table in design view. You’ll see a grid with columns for Field Name, Data Type, and Description. Enter the name of the first table field on the first line and then click the dropdown arrow in the “Data Type” field to specify what type of data you’ll store in this column. The “Description” field is an optional comment that you may want to use to remind you of any special information about particular columns.
Step 3: Set field properties – As you enter your fields in the design view, you may want to set more advanced properties for some of them. The “Field Properties” pane at the bottom of the screen allows you to specify things like the length of text fields, the format of numeric fields, and whether or not a field is required:

Explore the Field Properties available and try to use them when applicable. They can be a simple way to format data, ensure quality data, and speed up data entry time.
Step 4: Set the primary key – Access tables should have a primary key, or a column that uniquely identifies each row. You can create the column yourself or let Access add one for you. To select a column as your primary key, place the cursor in the row and then click the “Primary Key” icon on the ribbon:

Step 5: Save and name the table – Once you’ve defined your table columns and set a primary key, you’re ready to save the table. Simply click the “Save” icon at the top of the ribbon and give your table a name. If you didn’t choose a primary key in Step 5, answer “Yes” to the pop-up message about primary keys and Access will create an “ID” field for you.
Step 6: Enter data – You can now double click the table name in the Navigation Panel on the left to enter data in a spreadsheet layout. Enter your data this way or create an Access form for a different data entry interface.
Creating tables in Access is a quick, easy process. Once the tables are complete, you can move on to forms, queries, reports, and more in Access.
If you've any question, problem, suggestion and feedback than please comment below.
Have a nice day!


Comments
Post a Comment